Thursday, January 31, 2013

Day 31- Seek and Find

Month #1, COMPLETE!!!!  31 days, 31 crafts and I still have ideas!!! :)

So, last month, I saw Seek and Finds done in a VOSS water bottle.  I have been looking since December for a PLASTIC VOSS bottle or a plastic bottle with a similar cap style.  The special thing about VOSS bottles is that the neck is wide, so you can fit a lot of bigger things in it.  Well, all I was finding was glass VOSS bottles, or glass bottles with wide necks, but nothing that was tall, skinny-ish, and plastic. So, while I looked, I planned.

In preparation for the seek and Find craft, Iris and I dyed rice last week or 2 weeks ago.  We had a lot of fun, and she was such a huge helper!  Dying rice is exactly like dying pasta.  A Tablespoon of rubbing alcohol and a LOT of food coloring.  I have decided that i like about 35-40 drops, WAAAYYY more than the 5-10 recommended, but the more coloring, the darker the color!  And, I looked for a bottle everywhere I went.

Yesterday, I found plastic VOSS water bottles at Mustard Seed.  So I quickly sucked up the 1.79 for a bottle of water and bought THREE, just in case!... btw, the water tasted like plastic- YUCK.  And today, the girls and I went on a scavenger hunt for small things to put in the water bottles.  We ended up with a myriad of small items... safety pins, dice, scrabble pieces, Yahtzee markers (why do you need markers for Yahtzee anyway???), some misc old jewelry pieces, marbles, googly eyes (obviously), beads, little figurines the girls got a few months ago, hair ties, rubber bands, etc etc etc.  I bet we ended up with close to 25-30 unique things to put in the bottles.  I split everything evenly, and the girls each got to put their things in the bottles.  
(I HATE BLOGGER PHOTO EDITING!!!!!!  I cannot get these two pictures to change places, I give up.. once again)
Once everything was in the bottles, we pulled out the rice and a funnel and I let the girls pick the colored rice they wanted to put in, let them pour the rice (with some help) into the funnel and we filled the bottles up (a little under 2 inches from the top).  Remember to keep some empty space in the bottle if you decide to do this at home with your kids because if you don't get enough room, your pieces won't mix up very well... well, not at all actually haha... I learned that the hard way.


To finish it off, I just hot glued the lids to the bottles and voila!  Seek and Finds!  And the girls were SOOO excited to show Mike when he got home.

Wednesday, January 30, 2013

Day 30- Thank You Cards

Today was sort of a no-brainer.  We needed to make thank you cards for Iris' birthday gifts (and Penny's potty training gifts) and I needed a craft.  How much more fun for the kids than to give them pieces of construction paper, markers, and stamps and say "have fun"


There isn't a heck of a lot to say about this one, but I will give a little mommy bragging here.  I wrote Iris' name on her cards in pen and asked her to "trace" them.  On one card, she wrote a big I and another one, she traced her name perfectly, and made the S bigger than the one I had made and told me "I wanted to do this one a little different."  It is amazing how big she is getting!!!!  I love my girlies :)

This may be against some of your beliefs, but I think that we can all agree that if there is someone in America, trying to make a better life for themselves and their family and happy to be an amazing father to 3 american born children and husband to an American wife, then he should be able to stay with his FAMILY in his HOME.  Please take a minute to check out: https://petitions.whitehouse.gov/petition/case-a200105108-1extend-stay-removal-2approve-cancellation-removal-and-3be-granted-hearing/JFBvG8n3 and sign the petition.  Be a part of the solution, not the problem.  Thank you.

Tuesday, January 29, 2013

Day 29- Birds

Let me start off by saying that as of tonight, I will hit 1000 page views!!! That is pretty exciting to me :)  So, thanks to all my readers out there.  I wish I knew who all of you are so that I could tell you each how much it means to sign on each day and see 15 or more new page views.  It definitely keeps me motivated to write a blog, even after a frustrating, exhausting day, and occasionally a total failure of a craft!

Iris informed me that she wanted to make birds today.  At first i thought "Ok, i'll get some different sized styrofoam balls, some construction paper, and some feathers.. let the kids stick feathers in the sytrofoam, glue some googly eyes on, a beak, and pipe cleaner legs, voila, bird"... but then i thought that i'd have to go to the store and buy feathers and styrofoam, so i decided to figure out a bird craft that we could do at home.
Any craft that we can either marker or paint is always a winner, so when i saw these birds on Pinterest, I figured that we could easily make these with everything we have in the house, and have a huge winner because we could paint and glue, and use googly eyes... only thing to make it better would be markers.

Supply list:

Paper plates
glue
googly eyes
construction paper
paint
scissors

This craft was SO easy.  All i had to do was cut ovals out of construction paper as the girls painted the back sides of paper plates that would become the birds' nests.  After the plates were painted, I cut them in half.  You could very easily use 1 plate to make 2 nests, but I glued the front and back together.  I was so impressed because I let Iris go with the glue, and she followed the curve perfectly.


I gave the girls glue and the face pieces, and I was pleasantly surprised to see how accurately they placed the eyes and beaks.  Once the birds were made, we used glue on the bottom half and stuck them inside their nests, and here are our birds.  Penny kept telling me how cute they were, so I think we hit a winner :)

I am only posting 1 picture because Blogger has me SO infuriated with the way it is uploading my pictures that I finally just give up!!!! GRRRRRRRRRRRR

Monday, January 28, 2013

Day 28- Butterflies? Crabs? Spiders? I don't know!

So, I decided to make butterflies today because they would be "quick" and we could do a lot of add-on things with them.... or so i thought! I had grand plans, but as always, they don't tend to turn out how I envisioned they would.  Mike painted the girls' hands and had them spread their fingers all the way apart and pushed them onto paper.  Then, he cut their hand prints out and glued the thumbs together.  At this point, we have overlapping thumbs that look like the butterfly body, with four fingers sticking out on either side that should look like wings.

Once everything was dry, Mike let the girls put googly eyes on their "butterflies" and color them with markers.  I had hoped to put antennas on them with pipe cleaners, but dinner got done before we got that far.

So, after the kids went to bed, we grabbed these "butterflies" to photograph them, and well, I don't think they look like butterflies!  They look more like a spider or a crab with an extra leg lol.  I don't know, but where they chose to put their eyes really makes them look like something other than a butterfly.  What do you all think? haha


Sunday, January 27, 2013

Day 27- Happy Birthday to my Iris!!


Holy.Crap.  4 years old today.  A friend posted this to Facebook today:
I almost didn't recognize her!  I miss when she was so quiet and small and didn't throw fits and talk back!  But, I also love every new phase and stage in its own way.  I am noticing so quickly how mature and grown up she is becoming and it is so exciting and so sad at the same time.  She isn't my baby anymore, but she can be such a huge help and asset to me and our family.  But, I've digressed from the point of this blog!

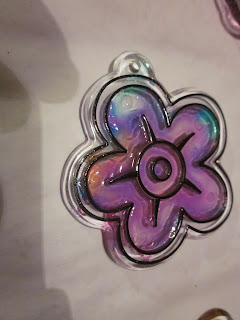
Aunt Natalie gave Penny a window catcher making set last night because she has started using the potty like such a big girl!  It is something I have wanted to buy the girls and make with them for quite awhile now, but I haven't had the money to buy all the parts and pieces and hadn't seen a nice little complete set to buy.  I loved them because the sun catchers were small and very simple, something great for a 2 and 4 year old with limited attention spans.

Given that we were traveling from Steubenville back to Cleveland today and didn't get home until slightly after 4, I was so thankful for that craft!  I grabbed a few extra paint brushes and let the girls choose sun catchers and let them start painting.  I love Penny's because it totally looks tie-dyed, and Iris really did a great job at painting her butterfly.

I am really looking forward to seeing the girls start making things like houses and stick figures while we are coloring.  I am hoping that at least Iris begins to do these sorts of things this year.

On a side note, I forgot a craft that we did yesterday at the Children's Museum:  Iris sewed a button on a piece of fabric, and I am going to take it this week and sew it on to another piece of fabric and make a pillow for her American Girl.  I was really impressed with her awesome sewing skills :)

Saturday, January 26, 2013

Day 26- Children's Museum

Today we went to the Children's Museum of Pittsburgh. Let me tell you, every time we go, it never ceases to amaze me at how much fun it is! And each time we go, the kids get more involved.  Today was so much fun to watch because the kids were so excited.

As soon as we got there, we started in the craft room because it involves a lot of drying time for things.  Painting was first, Iris HAD To color all of her paper in, and Penny really worked on the best ways to hold her paint brush, and enjoyed the ability to paint, obviously!

Then we went over and made screen prints.  Iris was able to help Mike decide what she wanted to make and what she wanted it to look like- a snowflake and many shapes.  Penny wanted a snowman.  I love screen prints, and for those of you not familiar with the process, at least at the Children's Museum, you cut out paper into whatever you want your picture to look like.  The thing to remember is that whatever you design won't have dye (or paint in this case) when the product is finished.  So, we cut out shapes, (I will base this off Penny's design) of snow men.  I cut out 3 different sized circles, a nose, 2 hands, and 2 boots.  Then we took the pieces over to the screen print table, picked the color paper we liked, and then laid the pieces we cut onto the cardstock.  After the pieces are aligned on the cardstock, we put a screen over the paper and pieces, and then pour paint over the screen and spread it with a large spatula like thing.  Once the entire paper is covered, you lift the screen and your picture is done.  At the museum, you actually get to run the painted picture through a big dryer thing.


The last art we did in the craft room was make your own paper.  We have done this every time we have been to the children's museum.  It is a square screen on a little wooden frame.  They put a second wood frame on top of the screen, then there are 3 bins of paper pulp with a TON of water with ladles.  Then, you just ladled the paper pulp into the frame until you can't see the screen anymore.  Once the screen is covered, you sponge the excess water off the paper pulp and then they cover the pulp with a towel and put it under a vice and press as much water out as possible and then let it sit to dry.


That was all the crafts we did today, but I did manage to make a # 4 for Iris out of paper.  I have to finish this up because I don't think it is making much sense, i've been writing this for almost 2 hours lol.

Friday, January 25, 2013

Day 25- Birthday Cakes

Well, We are coming close to the end of Birthday Theme week.  Tomorrow, we won't be doing a birthday craft, we will be at the Children's Museum in Pittsburgh, BUT they have an amazing craft room.  I am really looking forward to going in there with the girls being a year older.  They LOVE the museum and I have been anticipating this day since I decided to do "Craft Year".  There are SO many crafts there that we are going to have a blast.  I can promise, MANY pictures tomorrow.  I will have a hard time picking which to use, I am sure!

So, back to today.  I wanted to make foam cupcakes, but Iris informed me "We already did cupcakes this week!" so, we made foam birthday cakes.

Supplies:

1) craft foam
2) glue

Can't be much easier than that, right?

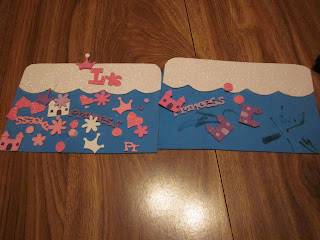
I know that the girls are so into Princesses right now, that I bought blue foam, pink and white glitter foam, and princess themed stickers.  How much more princess could we get???? Ok, well, I guess I could have gotten purple foam instead of blue haha.  But, It worked better to use the blue foam because the princess themed stuff would have been really hard to see on top of purple "cake".

I simply cut a piece of foam in half, then made icing out of the white glitter foam.  And let the girls go.  They both practiced using Elmer's glue today, and I was pleasantly surprised at how well Penny did.  Iris was a little heavy handed and had a lot of glops of glue.  When I give Penny a blank canvas, she has a blast, as you can see, she still loves to "color" and "marker."  At a certain point, I just say "go for it kid" and let her be.

Iris really enjoyed putting stickers on her cake.  She wanted to cover the ENTIRE thing in stickers, but I finally, after a LOT of convincing, talked her into leaving it like it is because it would be too hard see what she put on it if she covered it ALL in stickers.  I love the top of it, she insists that it is "Santa" it isn't "santa's house" or "the north pole" it is "Santa" :)  I love my kiddos so much!


On a side note, I picked up Iris' birthday cake tonight, and OMG!  I hope that we have an ARMY coming to her birthday because this cake weighs about 25 pounds!!!!!  Tomorrow's blog will be late because we have a CRAZY day planned!


Thursday, January 24, 2013

Day 24- Birthday medallions

Well, today ALMOST broke my resolution.  We had a minor catastrophy at our house when Coraline lost her blankie this afternoon.  I realized at 2:30, shortly before naptime, that Blankie was NOWHERE to be found.  I frantically called all the stops I made today and no one had seen it.  I laid her down for a nap without it, and she would NOT sleep!  I called Mike, in a panic, asking him "WHAT DO I DO?!?!?!" and he said "Take a deep breath, let her cry, do your craft with the kids, and if she isn't asleep by the time you're done, go look for it."  So, that reined me in enough that i was able to focus, somewhat on a craft until C finally fell into a VERY short sleep.  The good news is, I got the kids in the car, drove to McDonalds- 25 minutes from here- and found it, in the parking lot, covered in snow, run over a few times, with a hole in it.  But, I was able to repair the hole, wash the blanket and there is no sign of the near disaster.  I wish I had a camera to show how happy she was to see her blanket after 8 hours!

So, back to craft today!  I decided to make a medallion to go on the top of Iris' birthday cake with her.  I found this website http://www.scrapbooksetc.com/theme/occasions/birthdays/sweet-sixteen-birthday-crafts/?page=2 that gave me the idea, and I thought, "Wow, that is cute, fold some paper into an accordion, fold it to make a circle, and then glue stuff on top of it!  That is totally doable!!!" ummm, wow, this was SOOO much more complicated than I thought it would be!

I found a Youtube video, http://www.youtube.com/watch?v=_0XCWHsGj5Q, and HOLY $#!^ what have I gotten myself into?  I quickly realized that Iris would NOT be able to do this exactly with me!

Let's do the supply list quickly:

1) paper 12x12 and accent paper
2) paper cutter
3) glue stick & liquid glue
4) Shishkabob skewer

I altered our medallions from the video because I couldn't get 1.5 inches to work!  It just didn't want to stretch that far with 1 sheet.  So, I made them 2 inches wide and glued two pieces together then followed the directions.  With 2 pieces glued together, I didn't have to glue the centers together first, it made it loose enough that it laid down on its own.... I gave iris her own 2 inch strip that i let her accordion fold on her own, and decorate as she felt fit.  She liked coloring the "squares" she made.  Then we glued hers together and stuck the square paper center on the top.  Iris' was a bit harder than my circle because her accordion didn't really fold down well, as you can see.

At this point, Coraline woke up from her nap and was TICKED.  So I loaded the kids in the car and went back tracking to look for the blanket so we didn't have time to finish Iris' medallion completely.  She had asked for the gold sparkly foam sheet on her medallion, so I cut a gold sparkly "4" and glued it to the big medallion.  Once that stuff was dried, I flipped it over, cut a skewer to size, and glued it into one of the "peaks" of the accordion.  I hope that we will remember to take that with us on Saturday to add it to her birthday cake!

The nice thing is, I was able to have Iris to put some effort into mine as much as possible, gluing what she could, etc.  I have been trying hard to keep her involved in everything.  It came be hard, but it isn't impossible.  I learned one really valuable lesson today: things aren't always as easy as they first appear!  YIKES!!!!

Oh, and in totally unrelated news, I have learned to make crocheted flowers!!! :)  I am working on finishing a scarf for Iris, I will take a picture when done.

Wednesday, January 23, 2013

Day 23- Party hats

Today, I stayed off of Pinterest, so I didn't get sidetracked, and I finally got to make party crowns.  I went between making them out of foam, out of construction paper, etc, and finally decided on a brown paper bag- not like I don't have 4 million of them!  So, I opened one up, cut 2 crowns out of it and let the girls go with markers.
What really surprised me today was that Penny was the most into the craft. She really enjoyed working on her hat. There were no fits, no screaming, no yelling, she just sat down and colored.  It could be because I actually FORCED her to nap today because she was SO exhausted.  She woke up on the wrong side of the bed, and by 1:10 she was STILL on the wrong side of the bed, so I put her down for a nap, she slept for 2.5 hours, woke up and was the happiest kid ever.  And since craft time was right after her nap, i think she came down in a good mood and well rested, and it made a world of difference.
Iris was very set on coloring the ENTIRE thing in, so she ended up getting bored not too far into it, but she had worked on it for close to 45 minutes when she told me she was done.  So, all in all, a successful craft day!  Sunday should be fun, we are definitely in the birthday spirit here!
 

Tuesday, January 22, 2013

Day 22- Birthday t-shirts

I woke up this morning hell bent on making party hats with the girls.  I didn't know if it was going to take the form of princess crowns, or big cone shaped party hats with ribbon coming out of the top.  But I was convinced I was making party hats for them.  Then, I came across this board on Pinterest and my entire YEAR changed course.  I think I was looking for something for my dad and stumbled upon, http://pinterest.com/joycelibal/kid-crafts/ and OMG the IDEAS!!!!  Well, one of the ideas was to use SANDPAPER and crayons to make Iron on transfers.  How fricking cute?????
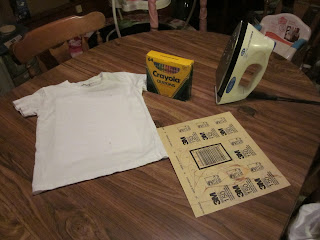
So, I ask Mike if we have any sandpaper I could "destroy" and head downstairs to get sandpaper and my iron, which I had packed away MONTHS ago in hopes that we would be in a new house by now, and 2 white play shirts the girls have.  I grab the crayons and we set to work.

Supply list- easiest one yet, i think!

 White t-shirt(s)
Sandpaper- fine-ish grit.  I used 150... any thicker and it EATS your crayons
Crayons
Iron
I put a piece of white paper between the layers of the shirt, just in case something were to bleed, or stick, or something, I don't know if it is possible, but since these are once and done things, I decided to use an abundance of caution.

I took a little sandpaper and wrote "I'm 4" on it and made a cake and balloons to go on the back of Iris' shirt.  Word to the wise, remember that you have to write BACKWARD on the sandpaper if you want it to come out right on the shirt :-p  I didn't write backward on my "test" cloth, and now I have  a cheese cloth that says "sgitsuL ehT"  Oh well, at least it was on a cheese cloth and not Iris' shirt!


Penny wasn't really feeling it too much, she wanted to color on the back of the sandpaper, which probably didn't make my iron too happy tonight.  So I colored most of her sandpaper, and to be honest, I was REALLY happy with the way it turned out!  But, Iris did well with hers, and she colored quite a bit before finally becoming board, so I wrote "Birthday Girl" (not so easy when you are trying to mirror image every letter!) and ironed it on to her shirt.

Once everything is colored, and the more color the better, don't be afraid to press hard, flip the sand paper over and iron!  I set my iron to medium, and it only takes a few seconds for the image to transfer.  The shirts look SOOO much better than the ink jet iron-on templates you get at the craft stores, and these are so much more personalized.
I honestly cannot WAIT until Saturday at the Children's Museum to see the girls wear these.  Now my real question is, how well will they wash??? I guess we will find that out sometime next week!

Monday, January 21, 2013

Day 21- Birthday Wands


Day 2 of theme week was Birthday Wands.  I will admit, I just about threw the wands out, the girls were being PAINS today.  But that is neither here nor there.
Yesterday, we went to Jo-Anns and I let the kids pick out foam that they wanted.  Iris went straight for the gold glitter foam sheet, which surprised me because there were beautiful pinks, blues, purples, and more glitter sheets that were much more typical colors for Iris.  Penny then chose a bright red glitter sheet, that wasn't so surprising to me.  Then we bought a dowel rod to cut down for the wands.
So, back to the normal supply list:

Foam sheets
scissors
Glue
Pom-Poms
Thin ribbon

I made Iris' a princess crown, which the gold sparkles worked well for.  Then I asked Penny what shape she wanted.  I do believe the conversation went like this, "Penny, what shape do you want?  A crown, a star, a heart?" To which, Penny responds, "A night gown!".... "A nightgown???", "A Nightgown!"  So, a nightgown is what she got! lol


Once I got the foam pieces cut out, I let them choose ribbon they wanted and cut long strands to attach to their Birthday wands.  As the girls worked on coloring stars, and other things, I quickly hot glued the pieces to the wands and then glued the ribbons to the inside before attaching the front and back of the wands together.  Iris loves pom-poms and googly eyes, so we obviously decorated her crown with those.  Then i cut out a number 4 from the red for Iris and a gold P for Penny.  The point in which I almost threw the wands away was shortly after I sat there, drew a 4, cut it out, edited it, traced it, cut it out again, and Iris promptly took it while I was gluing a pom-pom onto her wand, and ripped the 4 in half.  I was NOT a happy camper.  I almost didn't re-make it, but I decided that since this was a 4th birthday theme week, we needed the 4, even though I had already made the 4 pointed crown.


Alright, I think I am too tired, I'm just rambling now, I need to go upstairs and get under the blankets and get warm, 11.3* out and dropping... brrrrrrr.  Stay warm everyone!

Sunday, January 20, 2013

Day 20- Countdown to Birthday!


I saw the idea for today's craft MONTHS ago on Pinterest, and was saving it for a birthday week.  Well, Iris' birthday is the first birthday of the year, so we got to try it with her today.  These could be the EASIEST birthday cupcakes ever!  Someone with NO cooking skills at all could make these in no time at all.

Here is my supply list for today:
2 1/2 inch styrofoam balls
cupcake wrappers
hot glue
glitter glue (more on that later)
pom poms

So, first thing first: glue a styrofoam ball into the cupcake wrapper.  Iris chose fancy swirly ones @ Jo-Ann's today for $2.99.  And I still have 30 left over for REAL cupcakes!


Next, I mixed glitter glue using some basic Elmer's Glue and glitter.  I think ours was too thick, it was a little hard to paint on with paint brushes, but it worked.  I looked up a "recipe" for glitter glue tonight and it says to use Modge-Podge.  Maybe that would be a little easier, thinner, with Modge-Podge.  But, our way worked, it dried well, and you can see the glittery colors on the styrofoam, so i'll call that a success.

Then, we painted the "frosting" on the "cupcakes".  Once that part was done, we topped them with "cherries."  

 My goal is to attach a string/fishing line to them and hanging them from the holiday tree in the girls' room.  I can't figure out the best way to make them into ornaments, so I am still debating on that, but It was fun.  Mike even got to craft with us today and everyone really got to be creative and have fun with the cupcakes!


Saturday, January 19, 2013

Day 19- Houses


Iris wanted to make a house today for craft, so I asked her what kind she wanted to make.  Of course, between a house on paper and a stand up house, she chose a stand up house.  So that left me to wonder how to make a stand up house.
Conveniently, I just bought 2 boxes of tea, so I emptied the tea bags into the drawer and used the boxes as a base for houses.  Then I pulled out my various sized wooden Popsicle sticks and glue and went to work.  Penny really got into it, but that didn't surprise me, she got to use glue.  She would put a stick on the box and have me move it into place and we repeated the process until the very last side when she got tired of it.  I thought that was pretty good.  Iris managed to decorate her whole house by herself.  She loves things that she can make lines with, so this was right up her alley.
I will admit, I had to use Mike for his mind to make the roof.  He came up with this idea to take a piece of paper, fold it in half, and glue the sticks to the paper, then fold the paper and voila, roof.  Then, apparently I was REALLY tired, I couldn't figure out how to affix the roof to the house, and he once again came up with hot gluing the roof to the tops.  It worked really well... hot glue is such an amazing thing!

(Do you like the nice mixed drink that Mike made me tonight? Hope the blog makes sense hahaha)
Tomorrow is 1 week until Iris' 4th birthday, and this will start our first "Theme" Week.  ALL birthday, all week!  Any suggestions will be great! I think i'm going to try to make cupcake ornaments tomorrow, given that time allows. Oh and wish us luck, we find out how much our house is worth tomorrow morning, I'm nervous!

Friday, January 18, 2013

Day 18- Rainbows


I asked Iris what she wanted to make today, and she immediately asked to make a rainbow.  How much easier could a craft be than rainbows?  Construction paper, cotton balls, and glue: check, check, and check. Better yet, I knew where EVERYTHING was! (Double check! haha)
Of course, nothing is every THAT simple when you're talking about a craft with a 2 1/2 and almost 4 year old.. I wanted to just rip pieces of construction paper, glue them down, stick some cotton balls, on the ends, and DONE.   But, little pieces of paper, glue, and penny just don't mix.  So, I ripped paper for Iris and I and cut various sized 1/2 circles for Penny.  Then all she had to do was take the glue stick, slap some glue on it, and stick it to the paper.  That would be easy right?  Except she wanted NOTHING to do with craft time today.
So, Iris and I sat at the table and glued little pieces of paper in the shape of a rainbow.  She was REALLY into it.  Once we had the paper glued, we stuck the pulled cotton balls on the ends of the rainbow.  Then, Iris decided that she had to have a cotton ball on the "head" of the rainbow, so this is what she was left with.  She was proud of her rainbow though, because as soon as +Mike Lustig walked in the door, she ran to show him.


Thursday, January 17, 2013

Day 17- Snowmen!


I have to give a little shout out to the Admissions Director @ Spring Garden Waldorf School.   Penny and I were sitting in her office today and I happened to ask her what she wanted to do for craft today and Penny said "snowman!" So I started thinking about how to make one- we did a cotton ball snowman last month- and Amy mentioned "a sock snow man."  Well, that would be about the easiest thing EVER.  Honestly, how many mismatched socks are in this house?  I had batting with my sewing stuff, and everything else was in my craft supplies.


Here is our supply list for today:
1) Mike's white socks
2) scraps of fleece
3) googly eyes
4) hot glue
5) buttons
6) needle and thread
7) batting
8) tiny wooden stars and an orange marker
9) black marker

I gave each kid a huge pile of batting and told them to fill the sock up.  They filled the socks to up to the ankle.  I took them and turned the ankle to the inside and stitched them up.

Afterward, on Iris' snowman, I made three body parts by loosely sewing a circle around the sock and pulling it tight. I gave each girl a star and had them color it orange with a marker, then cut one of the tips off to make the nose, I glued the googly eyes on, had them tie a scarf around the necks, and pick out buttons.  I then hot glued all the pieces on to the snowmen with hot glue.

The girls loved the finished project.  Penny kept calling it her "baby" and they took them for a "walk" how flipping cute???